

John Pierce is an AEA Agronomist. This article originally appeared in the May 2026 issue of ACRES U.S.A. Magazine. Reprinted with permission.
The first breaths of Spring are here and if you’re anything like me, you’re getting the itch to put just a few (or maybe a few hundred) trees in the ground.
I got my start at mixed vegetable farms, and have since worked in nurseries, landscaping and now as a regenerative agronomist. In total I’ve planted and established well over 500 species across 6 hardiness zones. I’ve gotten to see a lot of what worked and what didn’t and in this article I’ll share many of the gems I’ve picked up along the way.
You’ve probably heard the old adage; “the best time to plant a tree was 10 years ago, the second-best time is now.”
It’s very true, and if you don’t yet have an order in for fruit trees or bushes, it’s not too late.
Depending on how you establish it, this could become a tree that nourishes you, your children, and your grandchildren—or a regretful stump you forget about and hit with the mower every summer.
How do we ensure success with this living, breathing investment?
- Protect the roots
- Water with purpose
- Build the soil interface
- Mulch like a forest
- Protect your investment (because come January your young tree’s cambium layer looks mighty tasty).
Before the Tree Goes in the Ground
Site Selection
“It’s all about location, location, location.”
The long-term success of a planting is largely determined by the site.
Good locations provide:
- Sunlight – Morning sunlight is especially valuable because it dries dew quickly and reduces disease pressure.
- Air drainage – Don’t plant where the frost settles!
- Well-drained soil
- Suitable slope orientation/aspect
- East or Southeast: are often ideal because they receive morning sun but avoid extreme afternoon heat.
- South: warm and helps fruit ripen in cooler climates but is prone to frost cracking of trunks and frost risk by encouraging early bloom.
- North: stays cooler and may delay bloom, which can help in frost-prone areas.
- West: can be hotter and drier and may increase heat stress.
Moderate wind protection and reliable water access also help ensure consistent growth and production.
In general, the best fruit sites combine full sun, gentle slopes with good air drainage, and well-structured, well-drained soil.
Protect Roots from Desiccation
Most transplant shock is dehydration.
- Keep roots moist at all times.
- Never leave bare roots in sun or wind.
- Heel in if planting will be delayed.
- Trim damaged roots cleanly.
Dig the Right Hole
- Dig 2–3x wider than root ball, 5x or more if using bareroots. You want lateral root exploration, not a clay pot. *If you are blessed with mellow, uncompacted soils this might not be necessary.
Potential Amendments for your Soil
- If soil P is low: Finely ground soft rock phosphate or bone meal (I prefer fish bone due to speed of availability).
- Gypsum for flocculation of clay soils; the calcium and sulfur it contains work wonders.
- Aged fungal-dominant compost, worm castings, or native forest duff.
- Carbon: Char or Humates for sandy, low CEC soils. (I’ve seen this work like a charm making a ‘foundation’ to retain organic matter in South Florida sand.
- Elemental sulfur: for lowering pH in calcareous soils or for blueberries.
- Trace elements: rock dusts, azomite, and paramagnetic rock dusts for you fancy folks.
Avoid
- Glazed “smeared” clay sidewalls. This watertight effect is a death knell; break them up in heavy clay soils.
- Ensure water infiltrates or your trees will drown. *I’ve seen $1,000+ specimen trees die a slow death in compacted clay soils.
Planting
Set the Tree
- Topmost roots should be level with soil surface
- No air pockets
- Roots spread
- Backfill with lightly-amended native soil, making sure any large clumps are chopped fine and amendments are mixed throughout
- Lightly firm soil in layers, no need to stomp
- Larger trees may need staking or trellising especially in windy locations.
First Watering
Water with purpose.
- Slow, deep soak
- Collapse air pockets
- Settle soil around roots
After Planting
Post-Planting Drench (Biology + Nutrition)
Once the initial soak has settled out, we can add the good stuff. A well-designed root drench functions like colostrum for the young tree, getting the shaky thing on its feet (roots). These are largely context specific, so adjust to your situation.
Goal:
- Stimulate rhizosphere biology
- Encourage early fine root initiation
- Reduce transplant stress
Ingredients:
- Clean water
- Fine, aged fungal compost or fresh vermicast
- Mycorrhizal and bacterial inoculum
- Cold-processed fish hydrolysate (Ideally one that retains the fish oil for your fungal farm workers)
- Cold-processed kelp extract
- Small amounts of molasses
- Small amounts of humates
- Trace amounts of chelated micronutrients
Use local, healthy biomes. You can inoculate locally specific microbes by harvesting the rootzone and duff layer from invasive or unwanted plants.
For instance, my area is inundated with Chinese privet (Ligustrum sinense) and its root system is already teeming with locally-adapted microbes. Those can be washed off and ‘borrowed’ to jumpstart your planting’s symbioses!
*Since mycorrhizal fungi and the majority of plant-symbiotic microbes can only reproduce on a living plant’s root system, this is a highly effective way to inoculate the rhizosphere. (You can leave the rice at home, KNF!)
I prefer a drench over just a root dip to inoculate and feed biology in the entirety of the new root zone. It uses more material so adjust to your situation. Many of these ingredients hold true for root dips as well, just be cognizant of dilution rates when these materials come in direct contact with roots.
Avoid high levels of soluble nutrition at planting: excess N pushes shoot growth before roots are established and high soluble P suppresses mycorrhizal colonization.
Mulching
Mulch may be the most underrated establishment practice. A huge nod to the late, great Michael Phillips for sharing his wisdom on the “fungal duff” layer.
Aged Compost (1–2 inches)
- Microbial inoculation
- Immediate nutrient cycling
- Improved surface structure
Aged Wood Chip Mulch (3–4 inches)
- Moisture regulation
- Temperature buffering
- Fungal stimulation
- Long-term carbon
Keep mulch 2+ inches away from the trunk and not piled against the bark: no volcanoes!
This mimics a forest’s O-horizon, stabilizing root zone moisture and promoting fungal dominance.
Research consistently shows mulched young trees:
- Grow faster
- Experience less drought stress
- Develop more fine roots
Post-Planting Drench Ingredients
Shop
$48.62
Rejuvenate™
$23.53
SeaShield™
$39.26
SeaStim™

$43.94
MacroPak™

$30.35
MicroPak™
$36.25
HoloCal™
$22.37
Spectrum™
Management during the first year
- Avoid high N
- Maintain consistent but not excessive moisture. *When weather allows, less frequent but deeper soaks train roots down deep for self-sufficiency.
*As a purist, it pains me to admit that I had real success with tree watering bags during a remote orchard’s first summer.
Encourage root establishment before canopy expansion. Fall is a great time to double back with a ‘Don’t call it a Soil Primer’ of more quality fish, kelp, molasses, and perhaps a light secondary inoculation.
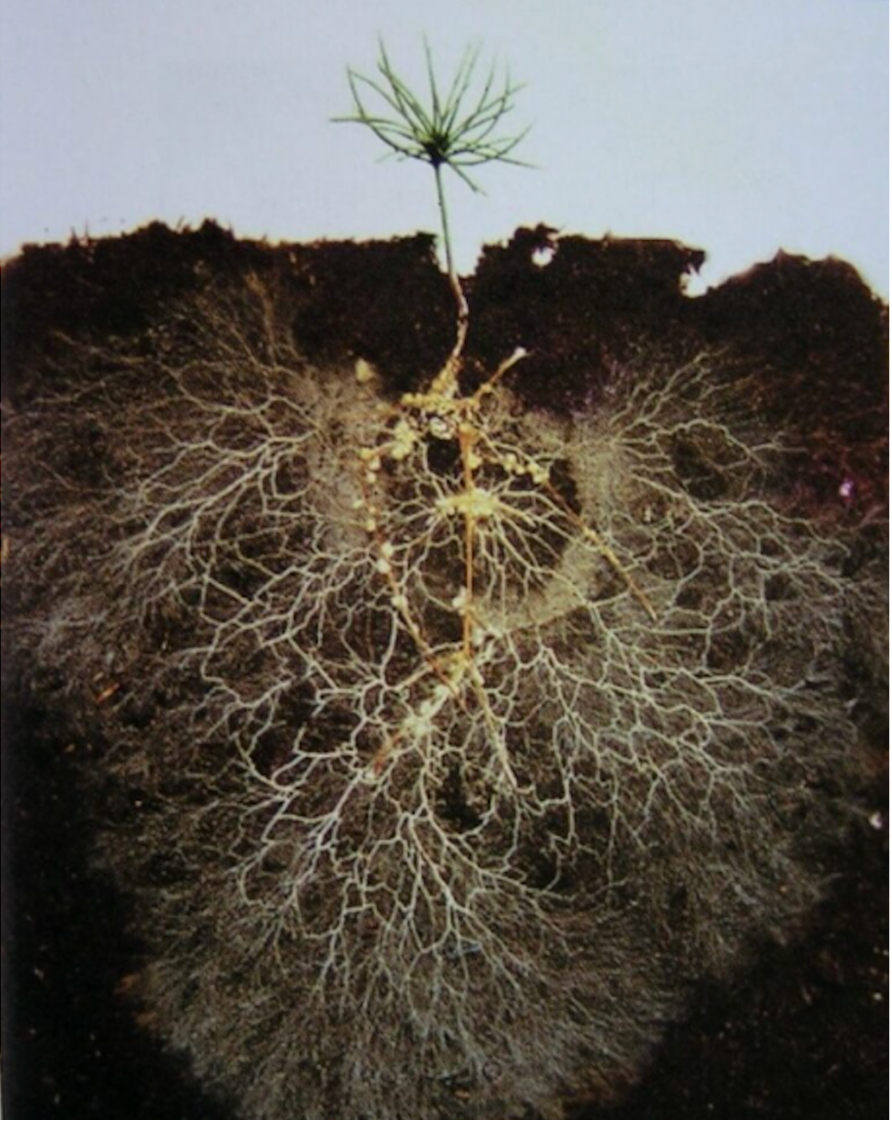
You want:
- Roots first.
- Canopy second.
Like this guy:
Common Establishment Mistakes
- Planting too deep
- Overwatering
- High salt fertilizer at planting
- No mulch / too much mulch
- Compacted sidewalls
- Ignoring root desiccation
- Over-amending the planting
- Not protecting your investment with tree wraps/tubes.
The Big Picture
Successful perennial establishment is about:
- Immediate biological activity
- Oxygen availability to the roots
- Consistent moisture
- Carbon-rich surface conditions: “Forest-style mulching”
If you follow these steps, you stack the odds strongly in your favor. The rest is up to nature.
“A society grows great when old men plant trees in whose shade they shall never sit”
– Elton Trueblood
Subscribe to our blog.
You'll get each post to your inbox (~1x/week).
You may unsubscribe at any time. We value your personal information. Here's our Privacy Policy.
"*" indicates required fields
